Enemy is Gallente (small standing loss .002). Warp in, the MJD out and snipe from very long range. 50 mins loot/salvage/tags 30 mil plus 7035 LP
Angel Extravaganza
EXP / KIN
Fast mission. Not gated, you warp in 40K from 4 BCs and 3 BSs – you can warp at range and ignore the towers. Loot/salvage is worth less than 1M, so just blitz it.
Angel Cartel Spies, The
EXP / KIN
Time consuming mission. Angels, so Bouncers, Berserkers or Warriors. ECCM , MWD optional.
Initial room has fair amount incoming DPS. Kill Scanner Post and Outpost to prevent one wave from spawning.
Second room: Fair amount of incomming DPS – Kill everything.
Third room: Just kill the Battleship to unlock the gate.
Fourth Room: Kill Storage Silo and Radio Telescope and no spawns appear (loot cargo box for 21M implant).
Fifth room: 3 waves after initial group – spawn after BS is killed in each group. Kill Tiogo Kargaz for completion.
Bonus Room: Need Angel Diamond Tag. Extreme incoming DPS. Kill towers. Kill Gist Seraphim last (spawns easy BS wave)
Are you Receiving?
Standing Loss with Amarr, so I am skipping this one.
Assault, The
KIN / THERM / ECCM
Warning: Gurista strat is different from Serpentis.
(Gurista). Blitz Method with Golem: Ignore first room, just take the gate. Second room: Mark group at 55K and group at 110K, then MJD twice. Destroy group at 55, then 110, then Starbase Control Tower (prevents spawn group), then last group. Always kill battleships first.
(Serpentis). Proceed through first two gates, ignoring hostiles. In the second room, kill the frigates that warp disrupt while heading to the gate 6KM away. Third room, kill all. Fit ECCM. High bounties in all rooms, but I haven’t tried to tank it, supposed to be high incoming dps. Fast completion if just blitz. Did mission again with full clear, very high bounties (20mil), salvage 15M.
Attack of the Drones
EM / THERM
High bounties and fast; warp at 100, drop Curators, snipe everything. No MWD
Blockade, The
(Serpentis)KIN / THERM / ECCM (Gallente Space) or (Angel)EXP / KIN (Minmatar Space). Warp at range, drop Wardens, be sure to have heavy drones ready if ships get too close. Several waves, triggered by Battleships, so kill them last in each wave (mission tip listed the trigger ship on most waves). I dropped a Mobile Depot so I could swap ranged scripts with ECCM as needed. Keep drones on aggressive.
Buzz Kill
EXP / KIN
Time consuming mission. Angels, so Bouncers, Berserkers, and Warriors. Lots of enemies spawn and you can’t warp in at range. After warp in, microwarp out to 70K from the beacon, or micro jump out and slowly work back to 70K from the beacon, stopping and sniping spawns with bouncers as you go. Have range script in OTL. Drop tractor at 70K from beacon and clean up frigates. Four battleships eventually spawn – destroy these to complete the mission.
Cargo Delivery
MWD / ECCM
Warp in and MWD toward warehouse (40KM). Hostiles spawn after looting warehouse (mission is complete, just warp out). Fit ECCM. Very quick mission. I completed in my Dominix without killing anything. If you warp back after looting mission item, you can kill hostiles with very high bounties (second wave), but they are Blood Raiders (with extreme neut), so Wardens are not very effective, need Curators or Ogres. Loot is low value, do it for the bounties.
Dread Pirate Scarlet
KIN / THERM / MWD / ECCM
Need Gate Key for blitz, which drops off last battleship at initial warp in – keep for next time so you can skip initial groups. MWD to each gate. At last (3rd) pocket, kill Scarlet and done.
Damsel in Distress, The
KIN / THERM
Warp in at 100K, be sure to have range scripts, destroy furthest Pleasure Garden, Damsel shows up in cargohold right after Pleasure Garden is destroyed. Depending on the angle of approach, the correct Pleasure Garden may not be the furthest (there are two). If the correct one is targeted, when armor is penetrated, reinforcement wave activates – if this doesn’t happen, switch targets.
Duo of Death
KIN / THERM
Take gate, drop tractor, kill the two battleships, wait for tractor to loot. Fast. No MWD
Evolution
Quickly destroy the tower (28K away) and leave. Very high incoming DPS from drones.
Exploited Sensitivities
KIN / THERM
Can’t warp at range, and high incoming DPS. Drones take a lot of damage. Be prepared for warp disruption. However, fairly high mission reward. Loot + salvage = 10mil . Worth doing if you can micro jump out and snipe – otherwise you lose too many drones. It’s a single pocket – strat is warp in, move out to 100K and snipe everything.
Gone Berserk
KIN / THERM / Range scripts
Warp into the pocket at range. Drop Wardens. Multiple reinforcement waves with triggers for next wave.
Initial trigger: Crusaders.
Wave 2 trigger: Death Knight.
Wave 3 trigger: Hydra.
Wave 4 trigger: Ogre.
Each wave has three groups, so carefully kill a wave before triggering next. Three Death Lords spawn as very last group (one at a time) – last one completes mission (but, all enemies need to die). Very high bounties, loot and salvage not good.
Alt Strat: Tanked short range battleship works fine, including heavy drones, like Wasps.
In the Midst of Deadspace
EM / THERM / MWD
Standing Loss with Amarr
Part 1: Initial: Drop Curators and tractor, kill everything, loot tags (15M ISK); Second pocket: Towers first, kill all, loot tags (4M ISK); Third pocket: Drop tractor and Curators. Top group first, kill the group that also comes in with that (back group). Bottom group next. Loot tags (30M ISK). Total tags = 47Mil. Mission is complete when Marines are looted.
Part 2: Simple courier mission, although I got one to deliver to low sec. Use a fast frigate with Warp Stabilizer.
Part 3: First two pockets are empty. Third pocket take out hostiles at range. Forcefield must be destroyed to get to the lootbox, which is 75KM away. Loot tags for 7M ISK
Part 4: Be sure to take the Gate Permit from your item hangar. Need MWD. No ECCM. Put drones on passive. First room, left group agros and approaches very quickly. Take middle group next, then right. Tractor in loot (20M from tags). Second Pocket: Kill hostiles and destroy the Stargate. Tractor in loot (2.6M from tags)
Part 5: Need ECCM. Be sure to take the Gate Permit. First pocket is empty. Second pocket: kill easy hostiles, loot tag. Third pocket: Drop Tractor, drones in passive. Left, then right, then middle group. Due to incoming target jamming, switched drones to aggressive. Took a long time to kill hostiles as they have very high resist. Switched to Wardens, seemed to work better against these Caldari enemies. Heavy incoming DPS from 3rd group. Kill Manufacturing Plant. 47M ISK in tags.
Infiltrated Outpost
EM / THERM / MWD / ECCM
Drop Curators, Destroy all in first pocket, take gate. Second Pocket: Destroy bunker (use mission tip to lock target) plus group at 75KM. No loot, salvage is low ISK.
Intercept the Saboteurs
KIN / THERM / ECCM
Initial warp in gate is guarded. Single pocket, last ship destroyed in center group drops the viral agent, but attacking them aggros entire pocket. I started on the right, which aggroed half the room, including the center group, but it didn’t aggro left side of room. Looks overwhelming, but the incoming DPS was not very high. Medium drones to clean up the cruisers and destroyers. Tractor in the mission object. I didn’t destroy left group.
Intercept the Saboteurs
Drop Curators, Destroy all in first pocket, take gate. Second Pocket: Destroy bunker (use mission tip to lock target) plus group at 75KM. No loot, salvage is low ISK.
Massive Attack
(Serpentis)KIN / THERM / MWD / ECCM Gallente and Minmatar space. Activate 1st pocket gate, it’s not locked. Second and third gates are locked, kill all hostiles. Fourth room: second group is over 120KM away, so MWD fit is needed. Kill all in last pocket. ECCM is needed.
(Sansha)EM / THERM Warp in, few frigs; First pocket frigs/destos/cruisers/BC – simple. Second Pocket same, plus a BS, frigs warp disrupt. Third Pocket: Group 3 spawns about 20 seconds after warpin at 100K. This is the only group that needs to be destroyed. Group at 24 will aggro and can be killed with light drones while killing group 3.
Mining Misappropriation
EM / THERM
Blood Raiders. Warp in, then MJD out and snipe everything, starting with the Hulk.
20 minutes total with loot and salvage 25 mil plus 7072 LP.
Mordu’s Folly
KIN / MWD
>
Part 1: Mordus NPCs. After landing drop tractor and micro jump to 100K. Snipe everything easily. Mission item drops in a cargo container from last ship destroyed.
Part 2: TANK Caldari NPCs. To avoid standing loss, only destroy the supply depot mission objective from at least 150K range. Extreme incoming dps from enemies as the get within 110K, so plan to move if you can’t destroy the depot fast enough.
Mordus Headhunters, The
KIN / EM / MWD
First pocket: Destroy all ships. Need medium and light drones for first groups as sentries get targeted.
Second Pocket, fly to the right to avoid agro on all groups. Need to destroy group at 80KM, to the right of the ruins (contains Mordus Mammoth) for completion. Loot and salvage is low, recommend blitz method.
Pirate Invasion
(Angel)EXP / KIN Killing group of 6 Battleships at 90KM with sentry drones (Wardens) completes the mission. Group 1 nearby agros. I stayed to kill all groups for bounty/loot/salvage. After first two groups, kill left group, then right group, then middle (i.e. BS groups first). No MWD needed.
(Sansha)EM / THERM 5 groups to be killed in order. DO NOT move your ship at all. Group at 35K auto agros and warp disrupts. Use Acolytes on the frigs and EM missiles on the BS/BCs. Need a solid tank. Ensure EM resist primarily, and Therm second. Group 5 (near the carrier) is at 90K, killing this group completes the mission. To clear all, next group to kill is at 80K (the group with no frigates). Then groups at 50K, then 70K. . 35 mins;10mil bounties; 8mil loot and salvage.
Pirate Slaughter
KIN / THERM
3 rooms, lots of battleships, which trigger next spawn wave. 21M bounties, 8M Loot/Salv, 2.8M Reward
Pot and Kettle
EM / THERM
Standing Loss with Amarr
Part 1: Warp in, drop Curators, kill Prophecy, done.
Part 2: Snipe all mines with turrets/missiles until complete (about 3 waves spawn). Explosions kill drones.
Part 3: Simple courier mission
Part 4: Kill ships until Amarr Recon ships spawn – mission completes when all are dead
Part 5: Be prepared for warp disruption, – kill everything in first pocket (3rd group is out of Curator range, so have a range script. Second Pocket: First group closes fast, use light drones. Other groups are easily sniped. 64 mil tags.
Recon
Part I: Blitz, use a MWD frigate and just take the gate – done.
Part 2: Blitz – MWD frigate to the gate, align, quickly warp out when mission completes.
Part 3: MWD Battleship – MWD to gate, take gate. Incoming DPS from toxic gas, need fair tank (took 11K damage).
Right Hand of Zazzmatazz, The
KIN / THERM
Warp at range 100KM (doesn’t exactly work as I came in at 50KM). Drop Wardens and destroy Zor and the Outpost, warp out. Elite frigates can warp disrupt, so be ready to launch light drones to kill them.
Ritualist Raids
EM / THERM
Blood Raiders. MJD and snipe with cruise missiles in both pockets. Second pocket, destroy the Cathedral, the battleships, and the destroyers for completion
Rogue Drone Harassment
EM / THERM
Warp to location: First room: drop Curators, kill Drone Battleship, which spawns a lot of adds as it takes damage. Clean up adds with Hobgoblins or Hammerheads or ogres. Fair amount of incoming DPS, also web and warp disruption, but easy with a reasonable tank. Battleship drops 5.1M Drone AI item. Gate is 7KM. Second room is simple, only a few hostiles.
Rogue Slave Traders, The
EM / THERM
(Sansha)
Part 1: Warp in normal (not at range), destroy slave pen (40K) and tractor in prisoners. Second BS spawns at 10min into the fight, I stayed to kill/loot/salvage (very low=1.6 total loot/salvage).
Part 2: Warp in normal, kill all ships to unlock the gate. Second pocket: Incoming DPS from towers is high, make sure you have correct resists fitted. Mission completes when the two cruisers are destroyed, but I killed the missile and gun towers first to reduce incoming DPS. Loot/salvage for Part 2= 1.6M. Loot/salvage is so low for the mission, next time I will microwarp to 100K and snipe the cruisers for blitz strategy.
Sansha Spies, The
EM / THERM
(Sansha)
Gated (cannot warp at range). Blitz: At warpin, destroy furthest group (90KM, 3BC, 1 BS) and warpout. [ 7mins, 900K reward, 2004 LP]
Score, The
KIN / THERM / MWD
(Serpentis)EM / THERM / MWD(Sansha) First pocket, lots of cruisers and destroyers – fast kills. Second pocket: cruisers and battleships, easy with Wardens. Third pocket: fast kills. Poor loot overall. Good salvage (13 mil).
Serpentis Extravaganza
KIN / THERM / ECCM
First room, kill everything to unlock gate. Second room: kill group at 30K first, then all others. Third room, kill group at 0K, then group at 35K (at Strange Rock Formation), then everything else. Kill Krayek Sarpanti (and the 3 Spider Drones) for mission completion. Salvage is good (18mil), loot=(5mil).
Serpentis Spies, The
KIN / THERM
Warp in, deploy Wardens. Can ignore towers, but Wardens take them out fast. Hostiles are 125+ KM away, so use a range script on a Sensor Booster, or wait for them to come into range. Kill all ships to complete mission. No loot of any value from wrecks.
Shipyard Theft
KIN / THERM
(Serpentis)First pocket: You get swarmed pretty quickly by closest two groups at warp in – have plenty of light and medium drones to clean them up fast. Drop Wardens for longer range groups. Gate is 10K away. Second pocket: lots of destroyers/cruisers and incoming DPS. Clean up with medium drones and switch to Wardens again. Destroy the storage silo and loot the crates. Salvage is good.
Silence the Informant
KIN / THERM
MWD not needed. OTL with Range Script. 3 rooms: No Blitz (loot is very good) – kill everything in each room (except last room), sentries last (they agro entire room). Battleships do high dps, kill them first. High value loot; good salvage. 3rd room, no good loot, just kill lone cruiser.
Smash the Supplier
KIN / THERM
Standing Loss with Amarr
Equip range script into an Omnidirectional Tracking Link. Warp to location, lock the control tower (using the mission tip), then fly away to 95KM, drop Wardens and attack the tower, only with the Wardens. After a few seconds, one of the Wardens will be targeted by the hostile ships, immediately pull that drone in, and leave it in. Aggro will drop and just keep shooting the tower with the remaining 4 Wardens until it explodes (about 7 mins). Done. Before turning in the mission, if you fly back, there is no aggro, you can fly to range and start killing. After 3 warpouts, and about an hour, the loot and salvage for killing everything was: 64mil Insignias (tags), 2mil random junk, 10mil salvage.
Smuggler Interception
EXP / KIN(Angel). First Pocket: Drop Wardens, kill left groups first, then middle, then right (used range script Sensor Booster). Gate to second pocket is 29K, switch to MWD while sniping right group. Second Pocket: Drop Tractor, drop Wardens, kill transport ship in second group (64-75K range) for the mission objective (10 militants). All of group 2 must be killed. Loot and salvage very poor (4mil), suggest blitzing this one (although total bounty = 7mil).
EM / THERM(Sansha) First pocket has 4 groups. Kill right group first, then left (which agroes adjacent group), then last group. Second pocket is same as above.
Stop the Thief
KIN / THERM
Warp in at 70KM, then snipe Overlord to spawn Shadow Mercenary BS, kill, and loot is automatically in cargo. Very fast.
Surprise Surprise
KIN / THERM
Warp in normal. To avoid standing loss, DO NOT KILL the transport ship (use a target painter to initiate the NPC spawns) or the towers. Kill everything else and loot tags. Kill Battleships last as they trigger spawns. Ignore towers. Easy, however, loot and salvage is time consuming, but tags are high value (30M).
Unauthorized Military Presence
EXP / KIN
(Angel): Blitz method: Initial warp in, launch Warriors to clean up small group while heading to gate 20KM away. First (and only) pocket: Drop tractor, destroy group at 100KM (kill the personnel carrier first) wait for loot (mission objective marines). All of that group must be destroyed. Extreme incoming DPS – you can warp out and come back for loot after a few minutes.
Vengeance
KIN / THERM / ECCM / MWD
Three rooms, all have a very large number of enemies, mostly cruisers and destroyers, but pretty high incoming DPS. Micro Jump Drive out (or MWD) to range in each pocket recommended. First two rooms, all enemies need to be destroyed. Third room, only group at 90KM (4 destroyers, 4 cruisers, 2 BS) is required, but the other two groups are small enough to kill anyway.
War Situation
KIN / THERM
Standing Loss with Amarr
Part 1: Destroy outpost and NPCs, loot tags. Part 2: Two pockets. Destroy General’s Quarters and the NPCs. Be sure to loot (tags and 5M implant). Total loot = 30M, Salvage 2.2M. Pretty fast overall.
Worlds Collide
KIN / THERM / ECCM / MWD
At warp in, choose Serpentis route, kill group guarding that gate (gate will unlock after the Battleships are destroyed). Second Pocket: Need to destroy all ships. Third Pocket: Need to kill group guarding near the damaged Heron to loot the objective. Mark this group first, if possible. Loot Heron when you can and mission is complete. Loot is poor, but salvage is good (20mil just on Serpentis side). Before turning in the mission, went back to clear the Gurista side (higher incoming dps) for only 2mil salvage, but 12mil additional bounties. Total for clearing all: 28 mil bounties + 22 mil salvage + 2 mil loot = 52mil ISK (plus mission rewards).
Level 3 Mission Notes
Completed for Amarr to gain corporation standing of 5 in order to start Amarr Epic Arc
Level 4 Mining Mission Strategies
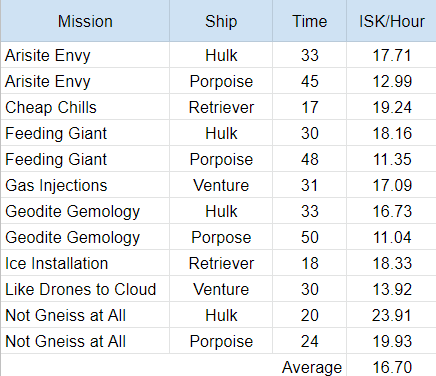
Arisite Envy • 45,000 m3, use Gneiss crystal (if skilled, but not required) • Ore Hulk or Ore Retriever, warp in, launch drones, position your ship within mining range of the 1 asteroid, jet can mine until it is mined out then return with a Miasmos and pick up all the ore ~ Using a Porpoise for this mission is a viable option
Cheap Chills • 20,000 m3, Ice mining • Ice Retriever, warp in, launch drones, orbit ice, AFK mine, can do in one load – you get a notice when the ice is mined out
Feeding the Giant • 44,800 m3, use Dark Ochre crystal (if skilled, but not required) • Ore Hulk or Ore Retriever, warp in, launch drones, position your ship within mining range of the 1 asteroid, jet can mine until it is mined out then return with a Miasmos and pick up all the ore ~ Using a Porpoise for this mission is a viable option
Gas Injections • 4,250 m3, Gas Mining • Gas Venture, warp in, launch drones, orbit gas, AFK mine, can do in one load – no notice is given when gas cloud runs out
Geodite and Gemology • 44,800 m3, use Crokite crystal (if skilled, but not required) • Ore Hulk or Ore Retriever, warp in , launch drones, position your ship within mining range of both asteroids, jet can mine until they are mined out then return with a Miasmos and pick up all the ore ~ Using a Porpoise for this mission is a viable option
Ice Installation • 20,000 m3, Ice mining • Ice Retriever, warp in, launch drones, orbit ice, AFK mine, can do in one load – you get a notice when the ice is mined out ~ This mission often spawns Drone Faction rats
Like Drones to a Cloud • 4,250 m3, Gas Mining • Gas Venture, warp in, launch drones, orbit gas, AFK mine, can do in one load – no notice is given when gas cloud runs out
Mother Lode • 44,800 m3, use Arkonor crystal (if skilled, but not required) • Ore Hulk or Ore Retriever, warp in, position your ship within mining range of all 8 asteroids, jet can mine until they are mined out then return with a Miasmos and pick up all the ore – don’t get too close to the asteroids (keep 5,000m away) they explode while you are mining them ~ I would not use a Porpoise for this mission, your drones orbit the asteroids too close and will take damage from the explosions. I typically decline this mission as drones are not recommended.
Not Gneiss at All • 21,000 m3, use Gneiss crystal (if skilled, but not required) • Ore Retriever, warp in, launch drones, position your ship within mining range of the 1 asteroid, mine until it is mined out then return to station and turn it it.
Anomic Mission Strategies
Specialized Fits for Anomic Missions
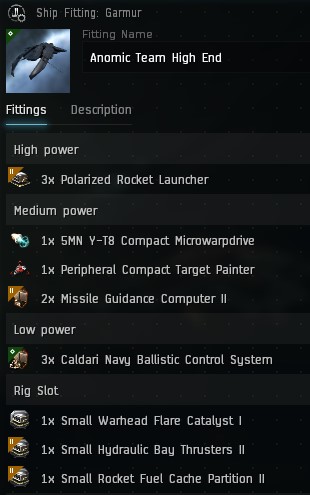
Anomic Team: Destroy the Vengeance
Use Garmur
Turn on MWD.
Orbit 20KM on Vengeance.
Kill one add using Caldari Navy Nova rockets, then kill the Vengeance using Inferno Rage rockets.
Anomic Team: Destroy the Hawk
Use Garmur
Turn on MWD.
Orbit 20KM on the Hawk.
Kill the Hawk using Mjolnir Rage rockets.
Anomic Team: Destroy the Enyo
Use Garmur
Turn on MWD.
Orbit 20KM on the Enyo.
Kill the Enyo using Nova Rage rockets.
Anomic Team: Destroy the Jaguar
Use Garmur
Turn on MWD.
Orbit 26KM on Jaguar
Kill one add using Mjolnir Javelin rockets, then kill the Jaguar using Caldari Navy Scourge rockets.
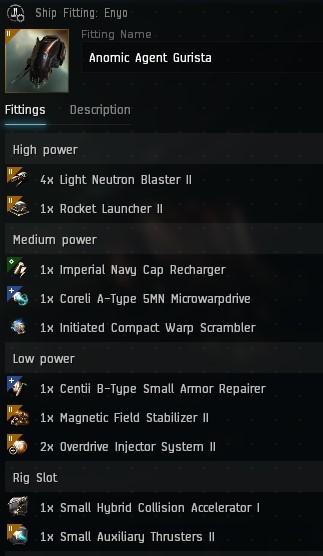
Anomic Agent: Destroy the Gurista
Use Enyo
Turn on MWD.
Lock target (Worm), set Keep at Range 2000
Start MWD cold then 2 cycles hot
Scram when in range, turn off MWD
Start armor reps and kill. Use Hornet drones and Scourge rockets.
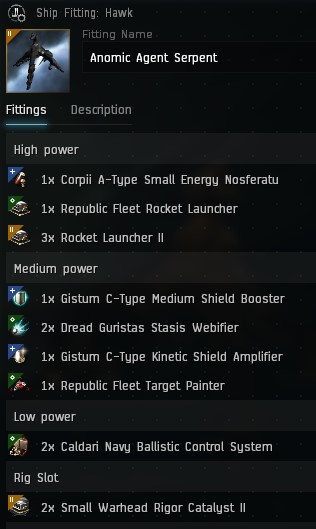
Anomic Agent: Destroy the Serpentis
Use Hawk with Scourge Rage Rockets
Lock target, no need to move at all
Turn on shield boost, then all modules, kill the Daredevil
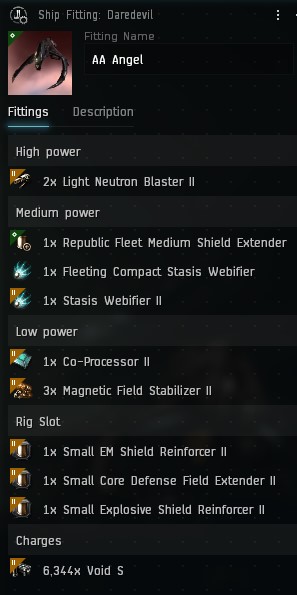
Anomic Agent: Destroy the Angel
Use Daredevil
Lock target, set Keep at Range 2000
Turn on scrams, overheat guns, kill
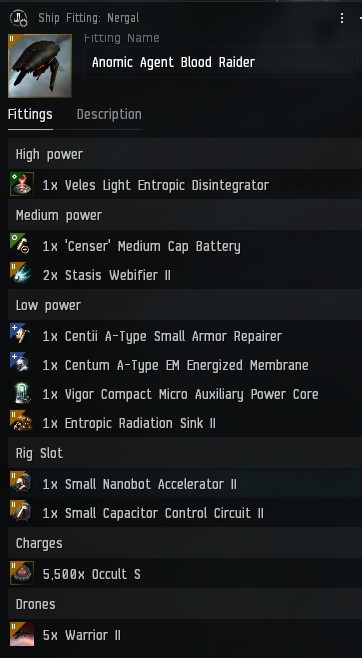
Anomic Agent: Destroy the Blood Raider
Use Nergal
Start armor repairs before taking gate.
Approach and lock target (Cruor)
Turn on gun and scrams, use drones and kill. Overheat armor rep, if necessary.